Roboclaw motor controller programming with python
Hardware
Mecanum wheels must be arranged specifically to utilize their omnidirectional movement.
Original: 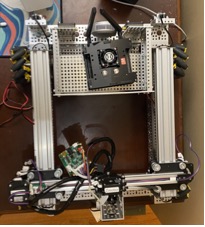 Corrected:
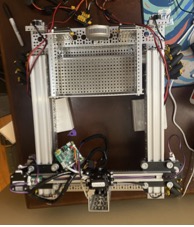
Firmware
Both motor controllers are connected to a PC. Note: the roboclaw is NOT powered via USB so it must be connected to the PDB to receive power.
Using Basicmicro Motion Studio (or an equivalent), each controller must be configured to the necessary specs.
Master
Control
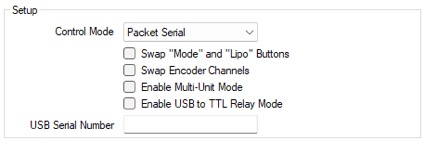
First, packet serial is enabled on the "master" controller. The master controller denotes the roboclaw that will govern the connection between the nano and the "worker" controller.
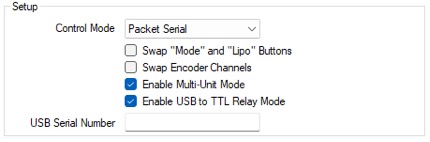
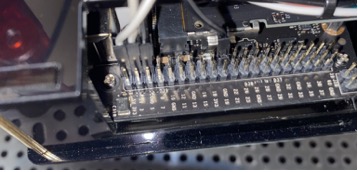
As seen above, the control mode must be set to "Packet Serial," Multi-Unit Mode enabled, and USB to TTL Relay Mode enabled. These settings switch the S2 connection on the master controller to an open-drain signal. The open-drain signal allows the S2 pin to receive packets from the worker controller, merging it with the UART output from the master USB connection.
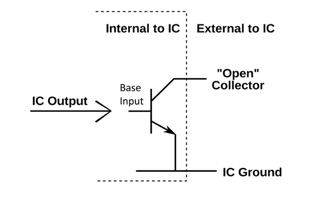
This is a visual representation of an open-drain signal.
Serial
Next, the serial information is configured for the master controller.
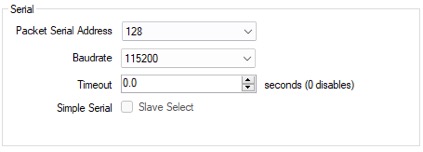
The serial address is set to a unique number (unique from the worker controller) and the baud rate is set to 115200 bits per second. Note that the baud rate can be set to any value above 38400 bps in Multi-Unit Mode but must match the baud rate on the worker controller.
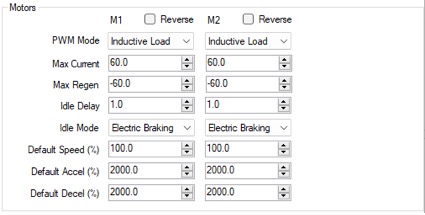
Motors
Finally, the motors are configured to electrically brake when not in operation.
Worker
Control
Next, the worker controller is configured in the software. The setup is very similar, with a couple of distinct changes.
The control mode is set to "Packet Serial" but the Multi-Unit Mode and TTL Relay switches are disabled. The Multi-Unit Mode must be disabled because the S2 connection must be available to validate the packets from the master controller.
Serial
In the serial configuration, the address is made distinct from the master controller's address.
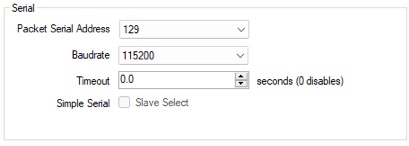
Note that the address can be any number from 128-135 as long as it is unique from the master controller's address. This allows us to differentiate between the controllers in the software.
Motors
Finally, the motors are configured to electrically brake when not in operation (same configuration as the master controller).
This concludes the firmware configuration of both controllers. Note that settings must be finalized by using the "Device" menu option in the top left of the window. 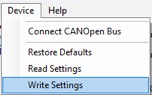
Wiring
UART
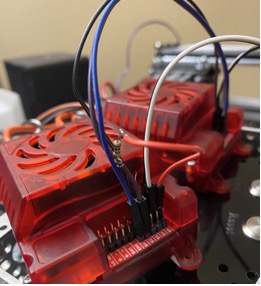
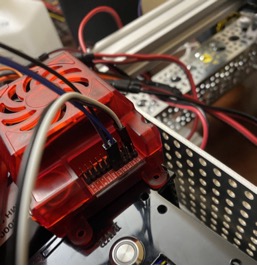
The master controller connects to the nano as an ACM (Abstract Control Model) object. This emulates a serial connection over USB to allow UART data transfer between the devices. To connect the worker controller to the master, a common ground must be established between the two controllers AND the nano. Next, according to this diagram, a 5.1K ohm pull-up resistor is connected between the master S2 connection and 5V. The 5V is derived from the (+) header on the master controller. This wire is connected to S1 on the worker controller. Inversely, another wire is connected from the S1 connection on the master controller to the S2 connection on the worker controller WITHOUT a pull-up resistor. This is because the open-drain connection treats S2 as a UART RX connection, and the S1 connection as a UART TX connection on the MASTER controller. On the worker controller, the S1 and S2 connections are UART RX and UART TX respectively.
Power
Finally, the jumper was removed from the nano, allowing power via GPIO, consequently disabling power via the barrel jack.
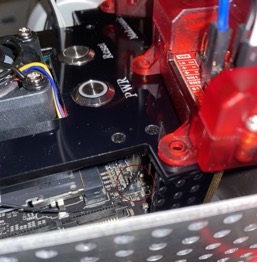
Note the red circle denoting the absence of the jumper. This allows the nano to be powered via GPIO from the BECs on the two motor controllers. 2 connections are made on EACH controller, (+) and (-) connected to 5V and GND on the nano respectively, on both controllers. Note: it may seem sketch but it was tested for a continuous two hours with no hitches in power delivery. Also note that power consumption can be found by issuing a simple command: sudo tegrastats
This allows the nano to harness more current from the battery to match the performance of the barrel jack power. This is important during high-intensity workloads from the GPU in future machine learning programs. This can be reversed by reinstalling the jumper. Note: if the jumper is reinstalled, the 5V connections on the GPIO become OUTPUT ONLY. this means that the nano will not receive power via GPIO and connecting power via GPIO will only turn the nano into a toaster (for a short time).
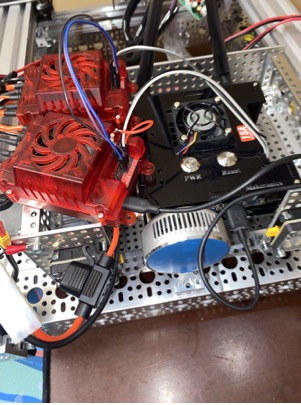
The final wiring configuration shows the two controllers and nano being powered solely by the battery. Finally, a master switch is added along with a resistive grounding strap to the metal chassis.
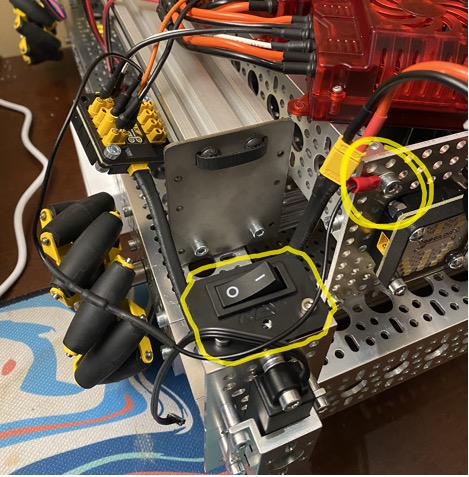
If everything is done correctly, both devices should initialize within the software when only the MASTER is connected via USB to the PC. Note: a voltage display is recommended to see the status of the battery during operation. 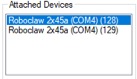
Programming
SSH
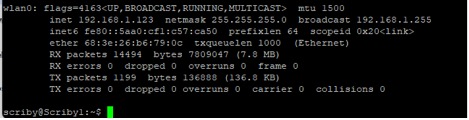
After connecting the nano to a monitor, the network is established to allow for SSH connection over a local network. Using ifconfig" , the IP address is realized and noted for the SSH connection.

Using an SSH client such as PuTTY or simply using the SSH function on the OS X terminal, a connection is established on port 22.
UART
After connecting the master controller, the command dmesg | grep tty is issued to see the serial device console.
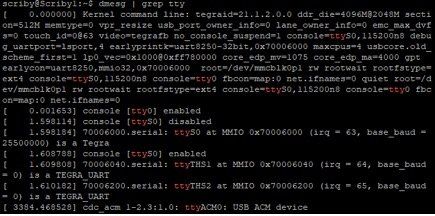
As mentioned earlier, the master controller is recognized as an ACM device at /dev/ttyACM0." This is important later in programming the controller.
The nano is updated via a standard apt update and apt-get upgrade to update repositories and upgrade needed packages. From here, "nano" is installed as a text editor for future programs using: sudo apt-get install nano."
A new folder is created on the Desktop named sohum to contain all programs created by Sohum.
Testing
To test the controllers, a program is created in nano called test.py within ~/Desktop/sohum/"

This is a very simple program to test both motor controllers. If a connection is successful between both controllers, motor 1 on both controllers will spin intermittently. Note that roboclaw\_3 must be used rather than roboclaw because roboclaw_3 is a module created specifically for Python 3.
Also, note the baud rate and destination specified within the roboclaw object.

Note that roboclaw_3 is imported. This implies that the depending library (roboclaw_3.py) is in the folder containing the program.

Note the list for the respective addresses of the controllers.

This notation is in hexadecimal notation, each quantifying to 128 and 129 in decimal notation, respectively.
Running this program successfully displays the connection to both motor controllers. Note, all programs utilizing serial devices MUST be run with sudo to allow root access to serial devices for Python.
Web Control
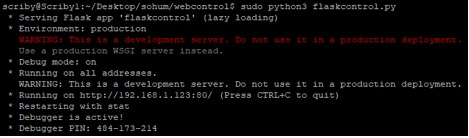
To utilize basic web control, FLASK is used to create a local web server. FLASK uses a special file structure to denote web elements.

To create a web app as such, a templates folder must be created for the index.html web file, a static folder for images and icons, and a Python program in the parent folder to control it.
Python program
Here is the Python program:
simple nano control with roboclaw controllers utilizing flask
import time
from roboclaw_3 import Roboclaw
from flask import Flask, render_template, request


app = Flask(__name__, static_url_path = '')


roboclaw = Roboclaw('/dev/ttyACM0', 115200)
roboclaw.Open()
addy1 = 128
addy2 = 129
last_direction = -1
speed_offset = 84
turn_tm_offset = 0.166
run_time = 0.750


@app.route("/")
def index():
   return render_template('index.html', name = None)


@app.route("/forward")
def forward():
   global last_direction, run_time
   go_forward()
   last_direction = 0
   time.sleep(0.100 + run_time)
   if run_time > 0:
      last_direction = -1
      halt()
   return "ok"


@app.route("/backward")
def backward():
   global last_direction, run_time
   go_backward()
   last_direction = 1
   time.sleep(0.100 + run_time)
   if run_time > 0:
      last_direction = -1
      halt()
   return "ok"


@app.route("/left")
def left():
   global last_direction, turn_tm_offset
   go_left()
   last_direction = -1
   time.sleep(0.100 + run_time)
   halt()
   time.sleep(0.100)
   return "ok"


@app.route("/right")
def right():
   global last_direction, turn_tm_offset
   go_right()
   time.sleep(0.100 + run_time)
   last_direction = -1
   halt()
   time.sleep(0.100)
   return "ok"


@app.route("/ltforward")
def ltforward():
   global last_direction, turn_tm_offset
   go_left()
   time.sleep(0.250 -(turn_tm_offset / 2))
   last_direction = -1
   halt()
   time.sleep(0.100)
   return "ok"


@app.route("/rtforward")
def rtforward():
   global last_direction, turn_tm_offset
   go_right()
   time.sleep(0.250 -(turn_tm_offset / 2))
   last_direction = -1
   halt()
   time.sleep(0.100)
   return "ok"


@app.route("/stop")
def stop():
   global last_direction
   halt()
   last_direction = -1
   time.sleep(0.100)
   return "ok"


@app.route("/speed_low")
def speed_low():
   global speed_offset, last_direction, turn_tm_offset
   speed_offset = 42
   turn_tm_offset = 0.001
   if last_direction == 0:
       go_forward()
   if last_direction == 1:
       go_backward()
   time.sleep(0.150)
   return "ok"


@app.route("/speed_mid")
def speed_mid():
   global speed_offset, last_direction, turn_tm_offset
   speed_offset = 84
   turn_tm_offset = 0.166
   if last_direction == 0:
       go_forward()
   if last_direction == 1:
       go_backward()
   time.sleep(0.150)
   return "ok"


@app.route("/speed_hi")
def speed_hi():
   global speed_offset, last_direction, turn_tm_offset
   speed_offset = 126
   turn_tm_offset = 0.332
   if last_direction == 0:
       go_forward()
   if last_direction == 1:
       go_backward()
   time.sleep(0.150)
   return "ok"


@app.route("/continuous")
def continuous():
   global run_time
   run_time = 0
   time.sleep(0.100)
   return "ok"


@app.route("/mid_run")
def mid_run():
   global run_time
   run_time = 0.750
   halt()
   time.sleep(0.100)
   return "ok"


@app.route("/short_time")
def short_time():
   global run_time
   run_time = 0.300
   halt()
   time.sleep(0.100)
   return "ok"


def go_forward():
    global speed_offset
    roboclaw.ForwardM1(addy1, speed_offset)
    roboclaw.ForwardM2(addy1, speed_offset)
    roboclaw.ForwardM1(addy2, speed_offset)
    roboclaw.ForwardM2(addy2, speed_offset)


def go_backward():
    global speed_offset
    roboclaw.BackwardM1(addy1, speed_offset)
    roboclaw.BackwardM2(addy1, speed_offset)
    roboclaw.BackwardM1(addy2, speed_offset)
    roboclaw.BackwardM2(addy2, speed_offset)


def go_left():
    global speed_offset
    roboclaw.BackwardM2(addy1, speed_offset)
    roboclaw.ForwardM1(addy1, speed_offset)
    roboclaw.BackwardM1(addy2, speed_offset)
    roboclaw.ForwardM2(addy2, speed_offset)


def go_right():
    global speed_offset
    roboclaw.BackwardM1(addy1, speed_offset)
    roboclaw.ForwardM2(addy1, speed_offset)
    roboclaw.BackwardM2(addy2, speed_offset)
    roboclaw.ForwardM1(addy2, speed_offset)


def halt():
    roboclaw.ForwardM1(addy1, 0)
    roboclaw.ForwardM2(addy1, 0)
    roboclaw.ForwardM2(addy2, 0)
    roboclaw.ForwardM1(addy2, 0)


if __name__ == "__main__" :
   app.run(host = '0.0.0.0', port = 80, debug = True)
Web program
Here is the HTML and Javascript script:
<html>
<head>
<title>scriby wifi control</title>
<script type="text/javascript">
document.onkeypress = keypressed;
var last_action = "";
var start_dt = new Date ( );
var last_mills = start_dt.getTime ( );


function sendMotion (action) {
   var run_dt = new Date ( );
   var mills = run_dt.getTime ( );
   if (action == last_action && (mills - last_mills) <= 500)
      return;
   last_mills = mills;
   last_action = action;
   request = new XMLHttpRequest ( );
   request.open ("GET", action, true);
   request.send ( );
}


function keypressed (event) {
   var keyCd = ('charCode' in event) ? event.charCode : event.keyCode;
   if (keyCd == 113 || keyCd == 81)
      sendMotion ('ltforward')
   if (keyCd == 119 || keyCd == 87)
      sendMotion ('forward')
   if (keyCd == 122 || keyCd == 90)
      sendMotion ('backward')
   if (keyCd == 101 || keyCd == 69)
      sendMotion ('rtforward')
   if (keyCd == 97 || keyCd == 65)
      sendMotion ('left')
   if (keyCd == 104 || keyCd == 72)
      sendMotion ('stop')
   if (keyCd == 115 || keyCd == 83)
      sendMotion ('right')
}


</script>
</head>
<center>
   robot control made by sohum suthar
   <font face="Arial">
   <table name="Table" border="0" cellpadding="6">
      <tr>
         <td align="center">
            <input type="radio" name="run_time" value="42" id="short_time"
            onclick="sendMotion ('short_time');">short
         </td>
         <td align="center">
            <input type="radio" name="run_time" value="84" id="mid_run"
            onclick="sendMotion ('mid_run');" checked>med
         </td>
         <td align="center">
            <input type="radio" name="run_time" value="126" id="continuous"
            onclick="sendMotion ('continuous');">cont
         </td>
      </tr>
      <tr>
         <td align="center">
            left forward
            <br>
            <input type="hidden" name="ltforward" value="0" id="ltforward" />
            <input type="image" src="arrow_up_left.png"
            id="imgLtforward" onclick="sendMotion ('ltforward');"/>
         </td>
         <td align="center">
            forward
            <br>
            <input type="hidden" name="forward" value="0" id="forward" />
            <input type="image" src="forward.png" id="imgforward"
            onclick="sendMotion ('forward');"/>
         </td>
         <td align="center">
            right forward
            <br>
            <input type="hidden" name="rtforward" value="0" id="rtforward" />
            <input type="image" src="arrow_up_right.png"
            id="imgRtforward" onclick="sendMotion ('rtforward');"/>
         </td>
      </tr>
      <tr>
         <td align="center">
            left
            <br>
            <input type="hidden" name="left" value="0" id="left" />
            <input type="image" src="left.png" id="imgleft"
            onclick="sendMotion ('left');"/>
         </td>
         <td align="center">
            stop
            <br>
            <input type="hidden" name="stop" value="0" id="stop" />
            <input type="image" src="stop.png" width="50" id="imgstop"
            onclick="sendMotion ('stop');"/>
         </td>
         <td align="center">
            right
            <br>
            <input type="hidden" name="right" value="0" id="right" />
            <input type="image" src="right.png" id="imgright"
            onclick="sendMotion ('right');"/>
         </td>
      </tr>
      <tr>
         <td align="center">
            left backward
            <br>
            <input type="hidden" name="ltforward" value="0" id="ltforward" />
            <input type="image" src="arrow_down_left.png"
            id="imgltback" onclick="sendMotion ('ltforward');"/>
         </td>
         <td align="center">
            backward
            <br>
            <input type="hidden" name="backward" value="0" id="backward" />
            <input type="image" src="backward.png" id="imgbackward"
            onclick="sendMotion ('backward');"/>
         </td>
         <td align="center">
            right backward
            <br>
            <input type="hidden" name="rtforward" value="0" id="rtforward" />
            <input type="image" src="arrow_down_right.png"
            id="imgrtback" onclick="sendMotion ('rtforward');"/>
         </td>
      </tr>
      <tr>
         <td align="center">
            <input type="radio" name="speed" value="42" id="speed_low"
            onclick="sendMotion ('speed_low');">low
         </td>
         <td align="center">
            <input type="radio" name="speed" value="84" id="speed_mid"
            onclick="sendMotion ('speed_mid');" checked>mid
         </td>
         <td align="center">
            <input type="radio" name="speed" value="126" id="speed_hi"
            onclick="sendMotion ('speed_hi');">high
         </td>
      </tr>
   </table>
   <br>
   <br><br>
   </font>
</center>
</html>
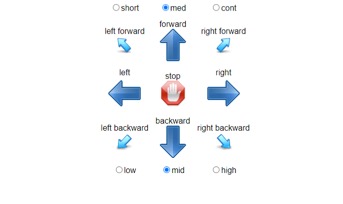
Running
Running the program:
Appearance
Conclusion
Although each motor is equipped with an encoder, two dedicated encoders are highly recommended to account for the accumulation of micro slips amongst the various motors during operation on inevitable, non-ideal grounds. Furthermore, a feedback loop algorithm is much simpler with only two encoders, reducing processor strain.
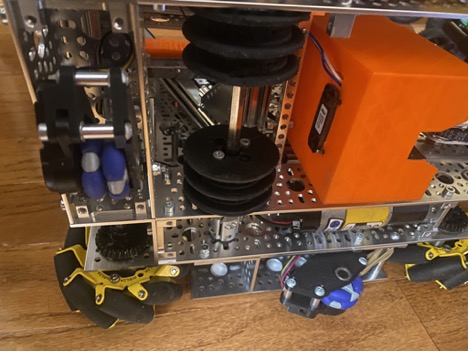
The two blue-colored omnidirectional wheels are tensioned toward to ground and give relative X and Y positions.
Some information may not be fully covered in this document. Feel free to contact me either at sohumksuthar@gmail.com or suthar.10@osu.edu.