Remote Experimentation with a VNA on Python
Sohum Suthar | Lee Teng @ aps
Info
Understanding the VNA Hierarchy: Channels, Traces, and Ports
Before you begin, refer to the setup docs if needed: Interfacing the ZVA-24 VNA with a Windows PC Using LAN with Python.
Channels
A channel on a VNA represents a complete measurement setup. Each channel defines specific measurement conditions such as frequency range, sweep type, and measurement parameters. Multiple channels can be configured on a VNA, and each channel can have multiple traces.
Parameters related to channels:
- Frequency Range: Defines the start and stop frequencies for the sweep.
- Sweep Type: Can be linear, logarithmic, segmented, etc.
- Number of Points: The number of data points in the sweep.
- Power Level: The output power for the measurement.
- IF Bandwidth: Intermediate frequency bandwidth, affecting the noise floor and measurement speed.
Example commands:
zva.write('SENS1:FREQ:START 1e9')  # set the start frequency of channel 1 to 1 GHz
zva.write('SENS1:FREQ:STOP 2e9')   # set the stop frequency of channel 1 to 2 GHz
zva.write('SENS1:SWE:POIN 201')    # set the number of points for the sweep in channel 1 to 201
zva.write('SOUR1:POW:LEV -10')     # set the power level for channel 1 to -10 dBm
Traces
A trace is a visual representation of a specific measurement on the VNA's display. Each trace is associated with a particular channel and measurement parameter. Multiple traces can be displayed simultaneously.
Parameters related to traces:
- Measurement Format: Defines how the data is displayed (e.g., Log Magnitude, Phase, Smith Chart).
- Trace Math: Operations that can be applied to traces, like addition, subtraction, averaging, etc.
Example commands:
zva.write("CALC1:PAR:DEF 'S11'")  # define the parameter for trace 1 of channel 1 as S11
zva.write("DISP:WIND1:TRAC1:Y:AUTO")  # auto-scale the Y-axis of trace 1 in window 1
Ports
A port on a VNA is a physical connection point where the device under test (DUT) is connected.
Parameters related to ports:
- Port Number: Identifies the specific port on the VNA (e.g., Port 1, Port 2).
- Port Extension: Adjustments made to account for delays or mismatches in the test setup.
- Port Power: Output power level specific to each port.
Example commands:
zva.write('SOUR1:POW:LEV -10')  # set the power level for port 1 to -10 dBm
zva.write('SENS1:CORR:EDEL:TIME 1e-9')  # set the electrical delay for port 1 to 1 ns
Sweep Modes and Segment Overlaps
The Define Segments dialog contains a table to edit the individual segments of the sweep range. Sweep segments may have common points or even overlap. However, overlapping sweep segments might lead to ambiguous behavior with certain functions like marker functions, trace evaluation functions, trace search functions, and band filter functions. Be cautious when using overlapping segments to avoid unexpected results.
Segmented Sweep Setup:
Example commands:
zva.write('SENS1:SWE:TYPE SEGM') # set sweep type to segmented
zva.write('SENS1:SEGM:DEL:ALL') # delete all existing segments
zva.write('SENS1:SEGM1:ADD') # add segment 1
zva.write('SENS1:SEGM1:FREQ:STAR 1e9')
zva.write('SENS1:SEGM1:FREQ:STOP 1.5e9')
zva.write('SENS1:SEGM1:SWE:POIN 201')
zva.write('SENS1:SEGM1:POW -10')
zva.write('SENS1:SEGM1:BAND 1e3')
zva.write('SENS1:SEGM2:ADD') # add segment 2
zva.write('SENS1:SEGM2:FREQ:STAR 1.5e9')
zva.write('SENS1:SEGM2:FREQ:STOP 2e9')
zva.write('SENS1:SEGM2:SWE:POIN 401')
zva.write('SENS1:SEGM2:POW 0')
zva.write('SENS1:SEGM2:BAND 3e3')
Commands Overview
Basic Commands for VNA Operation
Reset the VNA
zva.write('*RST')
Configure Channel
zva.write('SENS1:FREQ:START 1e9') # start frequency 1 GHz
zva.write('SENS1:FREQ:STOP 2e9') # stop frequency 2 GHz
zva.write('SENS1:SWE:POIN 201') # 201 points
zva.write('SOUR1:POW:LEV -10') # power level -10 dBm
zva.write('SENS1:BAND 1e3') # if bandwidth 1 kHz
Define Traces
zva.write("CALC1:PAR:DEF 'Trc1', 'S11'") # define trace 1 as S11
zva.write("CALC1:PAR:DEF 'Trc2', 'S21'") # define trace 2 as S21
zva.write("DISP:WIND1:TRAC1:FEED 'Trc1'") # display trace 1 in window 1
zva.write("DISP:WIND1:TRAC2:FEED 'Trc2'") # display trace 2 in window 1
Start the Sweep
zva.write('INIT1:IMM; *WAI') # start the sweep and wait for completion
Retrieve Data
s11_data = zva.query('CALC1:DATA? FDATA')  # get S11 data
s21_data = zva.query('CALC1:DATA? FDATA2') # get S21 data
USING THE VNA
Initializing the VNA
To initialize the VNA, you need to establish a connection with the instrument, configure the measurement channels, and set up the necessary parameters. Here’s a detailed step-by-step process:
Reset the VNA
Ensure the VNA is in a known state by resetting it.
zva.write('*RST')
Configure Channel Parameters
Set the frequency range, number of points, power level, and IF bandwidth for the desired channel.
zva.write('SENS1:FREQ:START 1e9')  # set the start frequency of channel 1 to 1 GHz
zva.write('SENS1:FREQ:STOP 2e9')   # set the stop frequency of channel 1 to 2 GHz
zva.write('SENS1:SWE:POIN 201')    # set the number of points for the sweep in channel 1 to 201
zva.write('SOUR1:POW:LEV -10')     # set the power level for channel 1 to -10 dBm
zva.write('SENS1:BAND 1e3')        # set the IF bandwidth for channel 1 to 1 kHz
Define Traces
Specify the measurement parameters for the traces.
zva.write("CALC1:PAR:DEF 'Trc1', 'S11'")  # define trace 1 as S11
zva.write("CALC1:PAR:DEF 'Trc2', 'S21'")  # define trace 2 as S21
zva.write("DISP:WIND1:TRAC1:FEED 'Trc1'") # display trace 1 in window 1
zva.write("DISP:WIND1:TRAC2:FEED 'Trc2'") # display trace 2 in window 1
Initiate the Sweep
Start the sweep and wait for it to complete.
zva.write('INIT1:IMM; *WAI') # start the sweep and wait for completion
Stopping the Experiment
To stop the experiment and safely terminate the connection to the VNA, follow these steps:
Stop Continuous Sweep
Ensure the VNA stops any ongoing continuous sweeps.
zva.write(f'INITiate1:CONTinuous OFF') # hold sweep for channel 1
Return to Local Control
Set the VNA to local control mode.
zva.write('GTL') # go to local
Close the Connection
Properly close the connection to the VNA.
zva.close()
See "Example Python Script" for a complete script incorporating everything above.
Advanced Commands for Specific Configurations
Set Sweep Type to Segmented
zva.write('SENS1:SWE:TYPE SEGM') # set sweep type to segmented
zva.write('SENS1:SEGM:DEL:ALL') # delete all existing segments
Add Segments to Sweep
zva.write('SENS1:SEGM1:ADD') # add segment 1
zva.write('SENS1:SEGM1:FREQ:STAR 1e9')
zva.write('SENS1:SEGM1:FREQ:STOP 1.5e9')
zva.write('SENS1:SEGM1:SWE:POIN 201')
zva.write('SENS1:SEGM1:POW -10')
zva.write('SENS1:SEGM1:BAND 1e3')
zva.write('SENS1:SEGM2:ADD') # add segment 2
zva.write('SENS1:SEGM2:FREQ:STAR 1.5e9')
zva.write('SENS1:SEGM2:FREQ:STOP 2e9')
zva.write('SENS1:SEGM2:SWE:POIN 401')
zva.write('SENS1:SEGM2:POW 0')
zva.write('SENS1:SEGM2:BAND 3e3')
Software Configuration
Reading Information Using Python
Install the necessary packages in your Python environment:
python -m pip install -U pyvisa numpy
python -m pip install -U pyvisa-py
Example Python Script
This script initializes the VNA, performs a sweep, and saves the data.
import os
import numpy as np
import pyvisa
import skrf as rf

vna_address = 'TCPIP0::your-instrument-address::inst0::INSTR'
experiment_name = 'vna_test'

with pyvisa.ResourceManager('@py').open_resource(vna_address) as zva:
    channels = [1]
    meas = []
    frequencies = []
    measurements = []
    trace_definitions = []


    for ch in channels:
        trace_names_and_defs = zva.query_ascii_values(f'CALCulate{ch}:PARameter:CATalog?', converter='s', separator='\n')[0][1:-1].split(',')
        trace_names = trace_names_and_defs[::2]
        trace_defs = trace_names_and_defs[1::2]
        zva.write(f'SYSTem:DISPlay:UPDate ON')
        zva.write(f'INITiate{ch}:CONTinuous OFF') # hold sweep
        zva.write(f'INITiate{ch}:IMMediate:SCOPE SINGLE') # select channel to sweep
        zva.write(f'INITiate{ch}:IMMediate; *WAI') # wait for sweep to finish
        all_data = []


        for trace_name in trace_names:
            zva.write(f'CALCulate{ch}:PARameter:SELect {trace_name}') # select active trace
            data = zva.query_ascii_values(f'CALCulate{ch}:DATA? SDATA', container=np.array).reshape((-1,2)) # get data
            data = data[:,0] + data[:,1]*1j # construct back to complex number
            all_data.append(data)


        meas.append(all_data)
        meas = np.array(meas)
        f = zva.query_ascii_values(f'CALCulate{ch}:DATA:STIMulus?', container=np.array) # get frequency (x-axis)


        frequencies.append(f)
        measurements.append(meas)
        trace_definitions.append(trace_defs)
        zva.write(f'INITiate{ch}:CONTinuous ON') # resume sweep in continuous mode


    zva.write('GTL') # go to local
    zva.close()


    scrape_vna.save_touchstone(bypass=None, freqs = frequencies, meas = measurements, trace_definitions = trace_definitions)
Program Flow
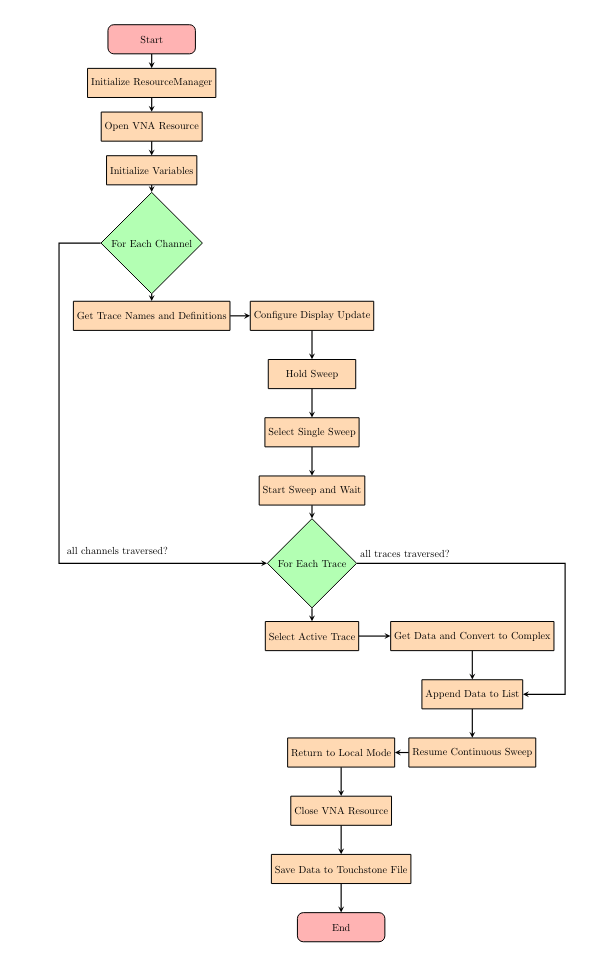
Code Summary
- Initialization: Connects to the VNA and retrieves its identification information.
- Data Collection: Performs a sweep, collects measurement data, and stores it in variables.
- Data Export: Saves the collected data into Touchstone files for further analysis.
Using the Script
- Ensure you have the necessary Python packages installed.
- Modify the
vna_addressto match your VNA's IP address. - Run the script to perform the sweep and save the data.
Additional Resources
For a detailed setup guide, refer to the Interfacing the ZVA-24 VNA with a Windows PC Using LAN with Python.